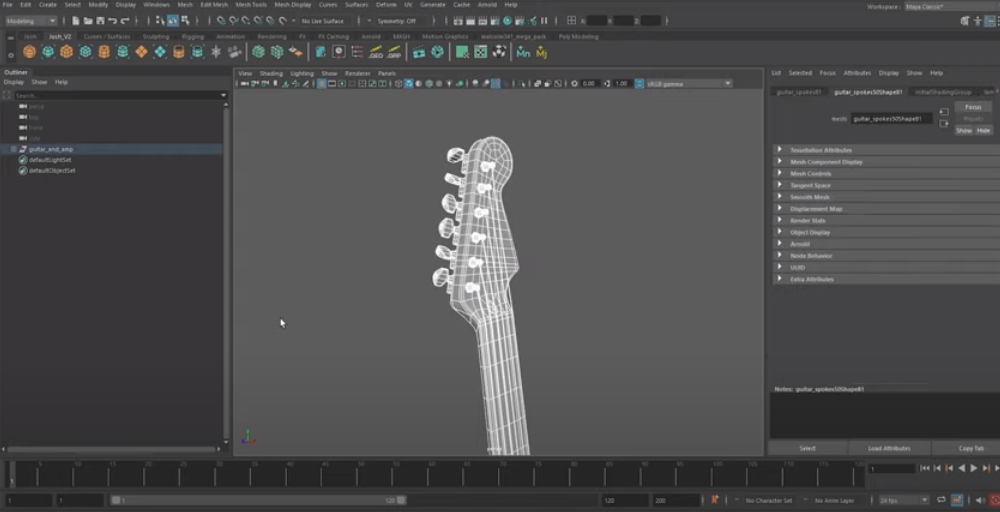
Autodesk Maya, popularly called Maya, is professional 3D software for creating realistic characters and blockbuster-worthy effects, including natural-looking hair, clothing, and dynamic simulations. One of the best tools for animators and digital artists who create motion graphics and visual effects for film and video games, Maya gives you the flexibility to create anything from simple animations to the most complicated virtual worlds.
Maya will allow you to create absolutely anything you can imagine; breathtaking natural scenes, whimsically animated cartoon characters and much more, and built to accelerate workflow. Maya can also be used for architectural designs and rendering, building design, or even movie visual effects.
With the Maya 3D tool, you can easily create global illumination textures in simple steps. Global illumination is used in computer graphics by applying virtual lighting to an image. The effect is an image that appears to be illuminated by a global light source, but not dependent on the viewer's direction, like other methods (ambient occlusion or directional light, for example).
The Maya glTF 3D Tool is a great new addition to the Autodesk Maya 2016 software. It's a 3D modeling tool that helps users create, edit, and convert geometry into the glTF format. The glTF 3D tool in Maya achieves a smooth workflow with clean-up and manipulation of geometry, which further enhances its usability for the motion graphics, visual effects, and game creation industries.
The Maya plug-in lets you export Maya glTF files to the p3d.in 3D model hosting and visualization framework. In this tutorial, we will discuss five modeling tools in Maya 3D. When talking about modeling tools, you need to know the difference between modeling and sculpting.
Modeling is where you build the object's shape, while sculpting is where you add fine details using brush strokes. We are going to talk about Maya's modeling tools first.
Maya's Menu Bar is located at the top-most part of the screen with seven menus that are always available and remain unchanged regardless of the Menu Set you are working with, and several submenus that change depending on the Menu Set that you choose. The fixed seven menus are File, Edit, Create, Select, Modify, Display and Windows.
There are five menu sets in Maya: Modeling, Rigging, Animation, FX and Rendering. The "Status Bar" is located right under the "Menu Bar" and this is where you can choose amongst the different Menu sets available in Maya. When you choose a Menu set in the Status bar drop-down list or use hotkeys to switch between them, some of the menus displayed in the Menu Bar will change to conform to your selection.
The "Shelf", found at the top part of the screen right under the Status Bar, is where you will find quick access to some of the most useful and frequently used commands and tools in Maya including "Poly Modeling", where you can easily create shapes such as "Cube", "Sphere", "Cone" etc., "Curves/Surfaces", "Rigging", "Animation" and so on. Each one of the tabs has different tools specific to them.
"Status Line" is found right in between the Menu Bar and Shelves. This line mostly indicates the on/off status of various modes such as "Mirroring", "Object vs Component", and so on. It also contains shortcuts to some basic file and rendering commands. The "Viewport" is found at the center of the screen and this is where you can view your 3D model in space, move, and manipulate its form in real-time.
The tools found at the left side of the Viewport are called "Toolbox" and are used to select objects, transform them, and navigate around the Viewport. This is where you will find commands used to move, rotate, scale, and pan around your 3D model or scene.
The "Panel Toolbar" right at the top of the Viewport gives access to all the View options available in Maya such as "View", "Shading", "Lighting", and other Viewport-specific settings. The four icons underneath the Toolbox are the "Panel Layouts" used to determine how the Viewport is split up. The options available include the default Perspective Camera, 4-View of the top, front, side, and perspective cameras, a 2-view option, and the "Outliner" which shows the list of all the objects in the scene.
The Panel on the right side of the screen consists of three tabs, each with different subtabs specific to them. The tabs are "Channel Box/Layer Editor", "Modeling Toolkit", and "Attribute Editor" used to edit values of the attributes of your 3D model or object. In the "Channel Box", you will find options that will enable you to edit animatable properties or attributes of your model.
At the bottom of the screen, you have the "Time Slider" and "Playback Controls" where you control the playback of your animation, and create and animate keyframes.
The textbox at the very bottom of the interface is where you type in commands to instruct Maya. The commands can be anything from a simple word to create shapes, to Python codes and more advanced scripts. The panels and tabs in Maya are completely customizable so you can undock them from their default positions and re-arranged as desired.
The easiest way to start modeling in Maya is by creating geometric primitives such as spheres, cubes, cylinders, and planes which can be the base for more complex objects. Drawing curves provides a base for creating 3D objects, or you can use them for other purposes. You can also load sample scenes that contain models that may be useful as a starting point for your own creations. These scenes are installed with Maya by default and can be accessed by navigating to the Menu Bar, and on the Menu Bar, click on "Windows", from the drop-down menu, select "General Editors", then "Content Browsers", and finally "Examples". This will display folders containing different models. Select the one of your choice, and drag and drop it onto the Viewport.
To create a polygon primitive, navigate to the "Polygons" tab on the "Shelf" at the top part of the screen and select any of the 3D shape icons at the left end. To create a cube for example, click the icon that represents "Cube" from the shelf. To create a NURBS (Non-Uniform Rational B-Splines) primitive 3D object or surface, open the "Curves/Surfaces" tab on the Shelf and click any of the 3D shapes icons displayed.
To draw a curve, click any of the Curve icons to the right of the Circle and Square icons, and then start clicking at different locations in a Viewport to draw points on the curve as desired. The options found on the panel at the right side of the screen including "Attribute Editor", "Modeling Toolkit" and "Channel Box/Layer Editor" contain numerous tools that can be used to manipulate your model as desired. In addition, right-clicking on your object will bring different options useful to select and edit different faces of your model. To edit components of your model, you can select "Component Model" in the Status Bar.
Once you are happy with the result of your model, the next step is adding material and texture.
As you model, you can map textures to various attributes of the material, such as color maps and transparency maps. You can map a 2D or 3D texture to your material. Textures map to geometry based on the object's UV texture coordinates.
To apply a material or texture to your object, navigate to the Menu Bar and click on "Windows". From the drop-down menu, click on "Rendering Editors" and select "Hypershade" from the fly-out menu. A floating window should come up. Here, you have everything you need to create your material.
To create and edit a material, ensure you are on the "Materials" tab at the top of the main view of the floating window. From the panel on the left of the floating window, you can choose from the list of different materials such as "Blinn" for reflective materials, "Lambert" for not-so-reflective materials, "Phong" etc., and create multiple materials needed for different parts or "faces" of your model.
When you select any of the material options, you are presented with a panel on the right of the floating window where you can edit and customize different attributes particular to the material selected. As you develop your material library, you can name the new materials for easy identification for future projects.
Now that you have created your materials, right-click on your object in the Viewport and click on "faces" from the widget or options displayed. Now select the face you wish to apply a material to, right-click on it, and from the menu listed, hover on "Assign Existing Material" and select the material of your choice from the options on the flyout menu.
To apply a texture, you can download textures of your choice from any of the numerous texture libraries online such as textures.com and cgbookcase.com, and apply it to your 3D model in Maya using Photoshop. It is important to "UV map" your model before applying texture. This can be done by navigating to the top right part of the screen, click on "Workspace", and from the drop-down menu, select "UV Editing". In the UV Editing window, you can select faces of your model and group them based on how you want your texture applied specifically to the selected faces. UV mapping is quite tricky for beginners in Maya, for additional help mastering "UV Mapping", click here. After a successful UV mapping, switch back to the Maya Classic workspace from the "Workspace" tab, save your UV map in either .png or .tiff format to be taken to Photoshop where you can apply the textures to your model and reload on Maya when you are satisfied with it.
There are some restrictions on the export of the glTF format. You can export transparent plastic material by using the diffuse color only.
When you export a glTF model from this application, you can import it into any other application that supports the glTF format, such as the p3d.in 3D model hosting and visualization framework.
Ready to export your model? Click File, then export. Choose a file type from the dropdown menu, give it a name and location, and click Save.
Unit size: If a scene is not utilizing scene units, it is best to set the unit size because it tells the program how big your geometry should be in real-life measurements.
The texture resolution in dpi: Texture resolution in dots per inch (dpi) varies for each part. The higher the dpi, the crisper your textures will be. However, your file size will also increase if you use a large dpi.
Ambient occlusion: The baked texture will include it when you turn on ambient occlusion.
Use Draco to compress the geometry: Compressing a scene using Draco will significantly reduce the file size of the geometry but will not affect texture quality.
The number of samples: A low value will result in an image containing excessive amounts of noise. Raising the value of a commodity increases its time to export it.
Please choose only one option (Geometry Nodes or Textures): It is impossible to apply both Geometry nodes (bubbles, flakes, displacement) and textures on a single part. This decision will determine whether you prioritize the effects of one type over another.
To upload your 3D model on p3d.in, you can either place your .obj file, .mtl and all texture files used into a single ZIP folder, or select the files together with all texture files used (.png, .jpg, .gif) when loading them onto the interactive viewer on p3d.in. The .obj file contains all the geometry data of your 3D model, and the .mtl file format contains the material details of your 3D model.
Other supported file formats are: GL Transmission Format .gltf/.glb, FBX (Filmbox) .fbx and STL format (.stl).
p3d.In is a platform where you can instantly share your 3D models online and in Augmented Reality (AR) in real-time.
To export your 3D model in Maya, select the object or the entire scene you wish to export, navigate to the Menu Bar, click "File", from the drop-down menu and select "Export Selection" . The Export Selection window will open and you can choose a desired file location to save your model. Select any of the file formats supported by Maya. In this case, .fbx or .obj is recommended for easy upload on p3d.in.
Now that your 3D model has been exported, you can go ahead and upload it on p3d.in.
In Maya, you can use modeling tools to create, modify, and combine geometry. You can use them to create surfaces and solids derived from surfaces. The tools in Maya are very flexible, allowing you to make a host of different modifications to your models. Let's look at five useful modeling tools you need to know about in Maya.
A 3D mesh can be made up of multiple polygons with multiple edges per face. Usually, via quads (four edges), more complex meshes can have n-gons (more than four edges).
Later on, these polygons are turned into triangles by 3D software because it's easier to manage and perform computation with triangles.
In this 3D model, we have triangulated and quadrangulated polygons.

You're rushing to complete a 3D model, and you've hidden details in areas to which you don't want the viewer's eyes to be drawn.
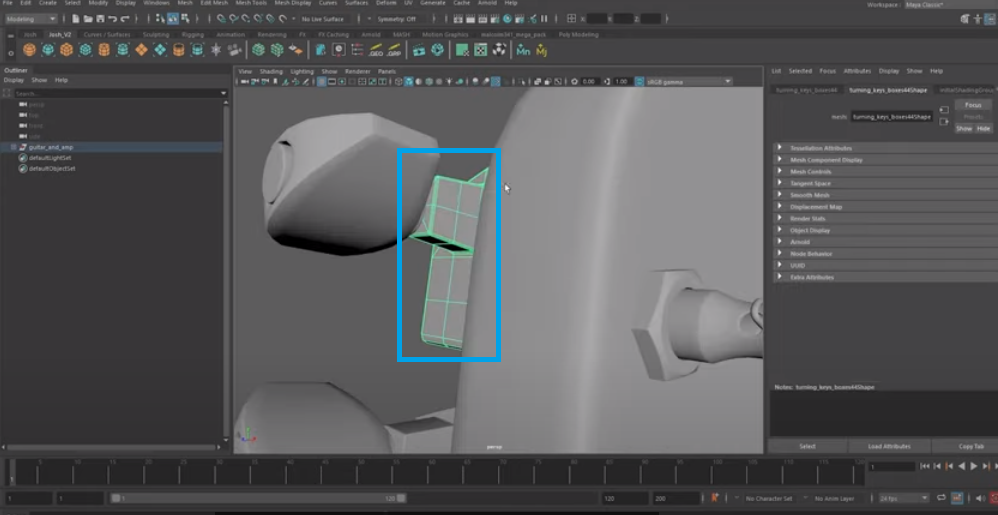
Many 3D modeling programs, including Maya, won't allow you to save a file with non-manifold geometry. Ideally, you should remove all the n-gons created by the modeling program before exporting your model.
There's a quick way to ensure the model doesn't contain n-gons and pass the checks. To fix this problem, you can use the N-gons utility.
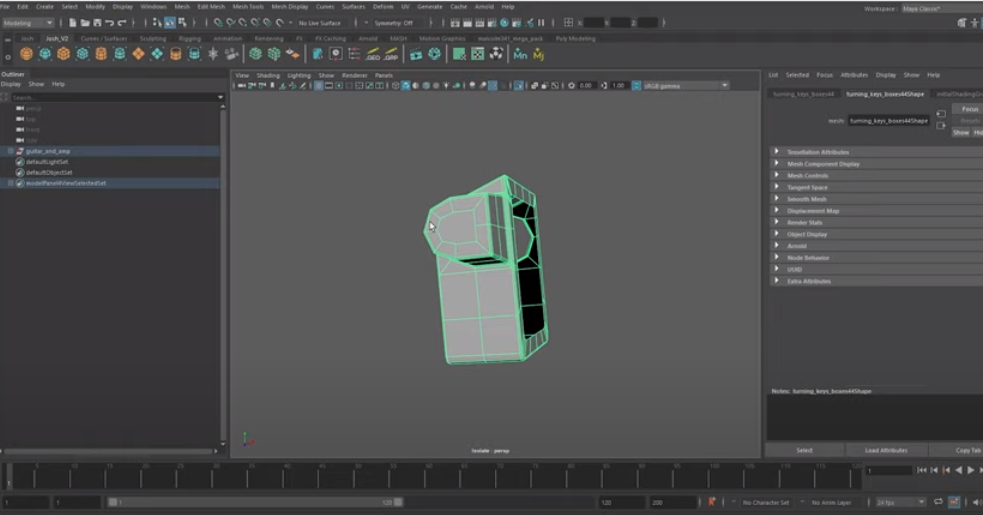
Go ahead and the faces of the objects you need to fix.
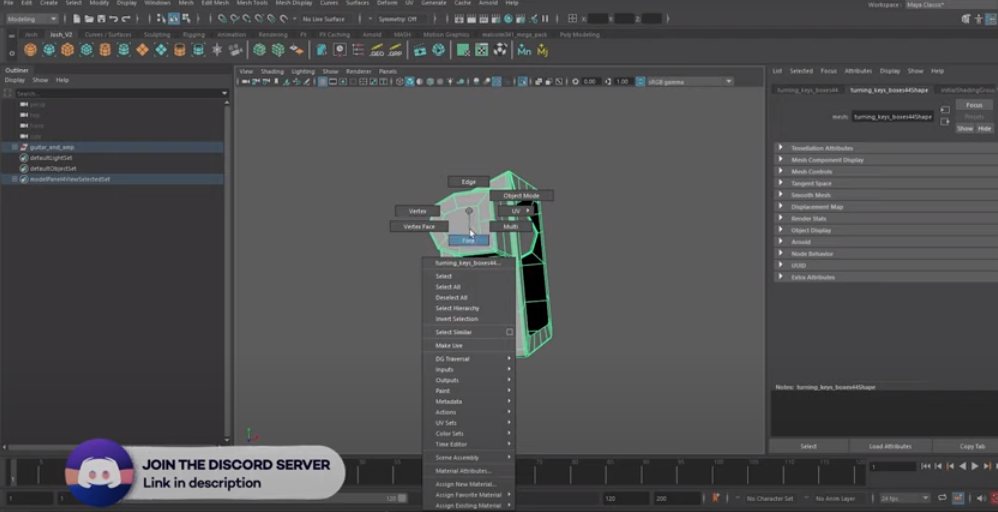
Select the face of the object that you need to fix.
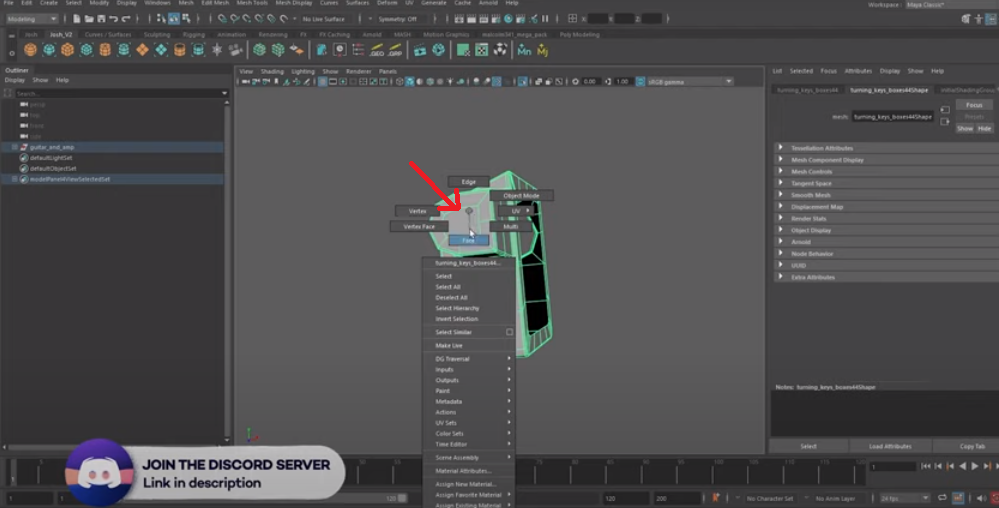
Triangulation is the process of finding edges in an array of points to extrude them and form poly faces. Triangulate is used to convert a polygonal (used in 3D animation, modeling, and rendering) object (n-gons) into triangles that your graphics card can easily handle.
Triangulating provides a great advantage to the user because it allows their computer's GPU to process triangles much faster than the standard polygons it creates.
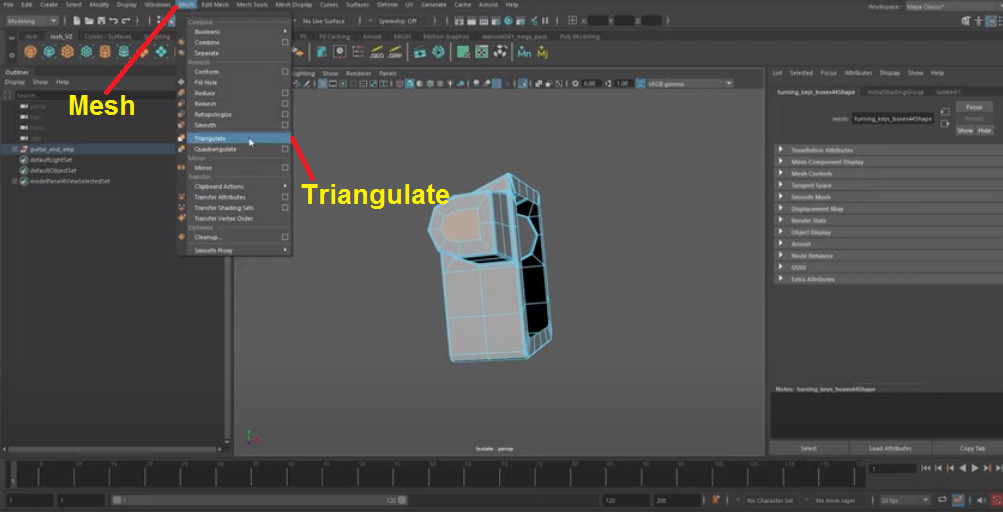
To convert the n-gons to triangles, click "mesh" in the ribbon at the top of the screen and then select "triangulate." As you can see, the n-gons are now triangles.
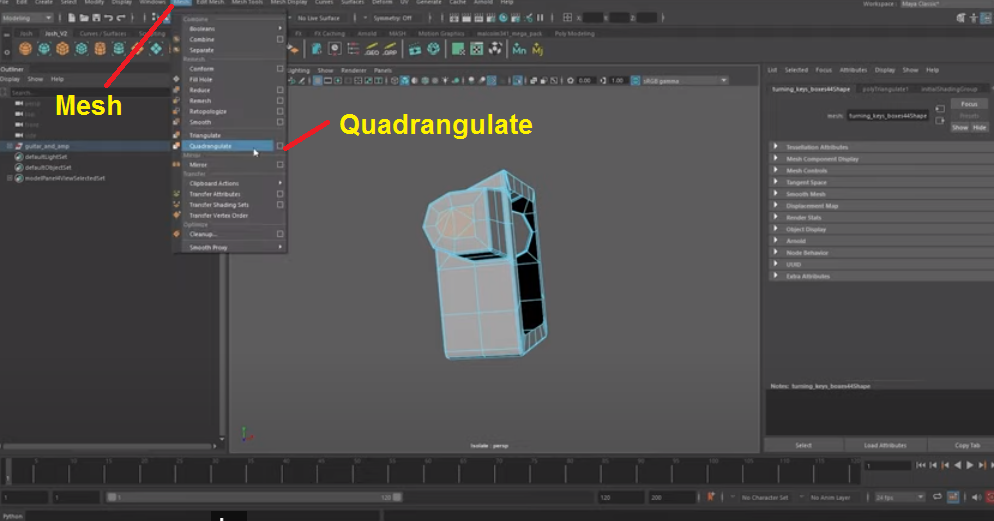
To convert the n-gons to quads, click "mesh" in the ribbon at the top of the screen and then select "quadrangulate." The n-gons are now quads.
This quadrangulate technique isn't recommended, but if the mistake is small and on a robot of considerable size, this approach might work and would not cause any problems.
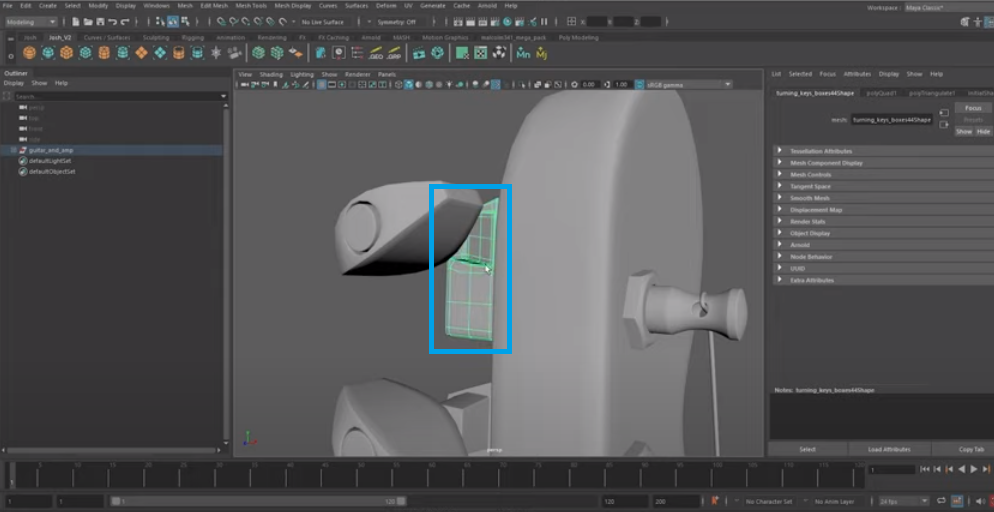
Now, with the p3d.in 3D model hosting and visualization framework, you can create beautiful 3D models from our high-quality Maya glTF files.
The Transform tool manipulates items in your scene, including points, vertices, edges, faces, and objects/surfaces. The Transform tool can also be used for creating and editing locators as well as adjusting the pivot point of items in your scene.
The Maya Transform tool is a simple and straightforward tool that allows users to reposition selected elements on a 3-dimensional (3D) scene on the X, Y, and Z axes. In addition, it allows users to move the selected element towards or away from the viewport and rotate the selected element in 360 degrees.
Let's cover the transform tool, which can be a great way to achieve a fast wood effect. You can use the transform tool on any component of a polygon mesh, including edges, vertices, and faces. To demonstrate this, we've modeled a wooden plank in Maya using just planar polygons and converted it into an editable poly object.
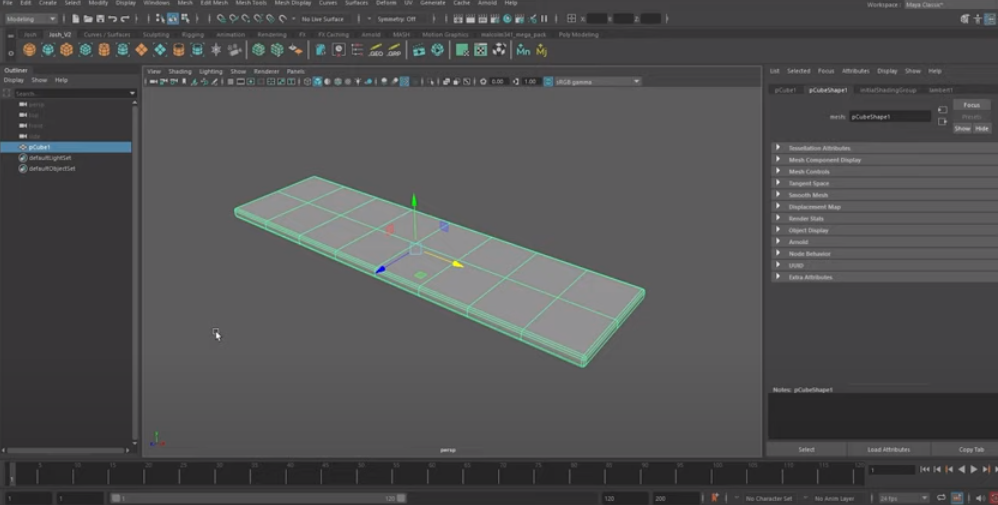
It's not very realistic, but you can quickly add some detail to this mesh with this tool.
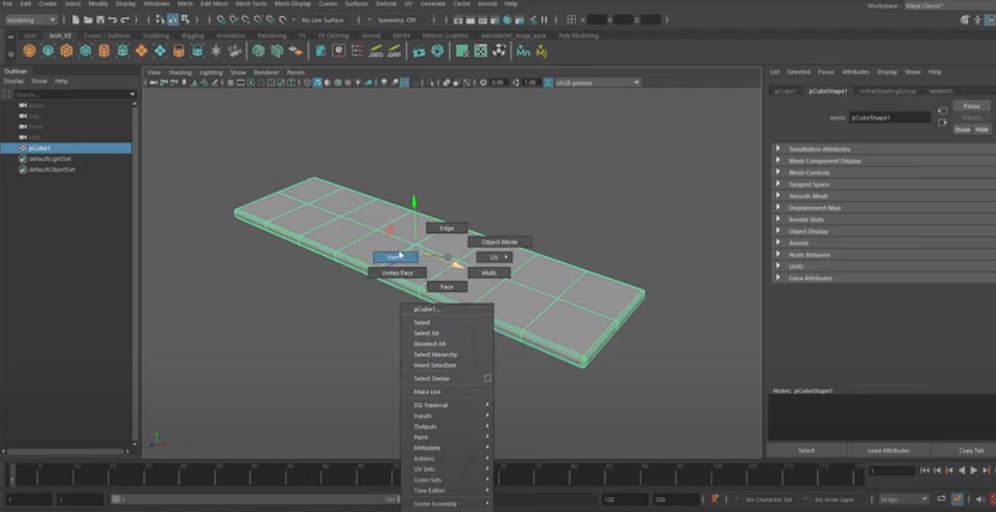
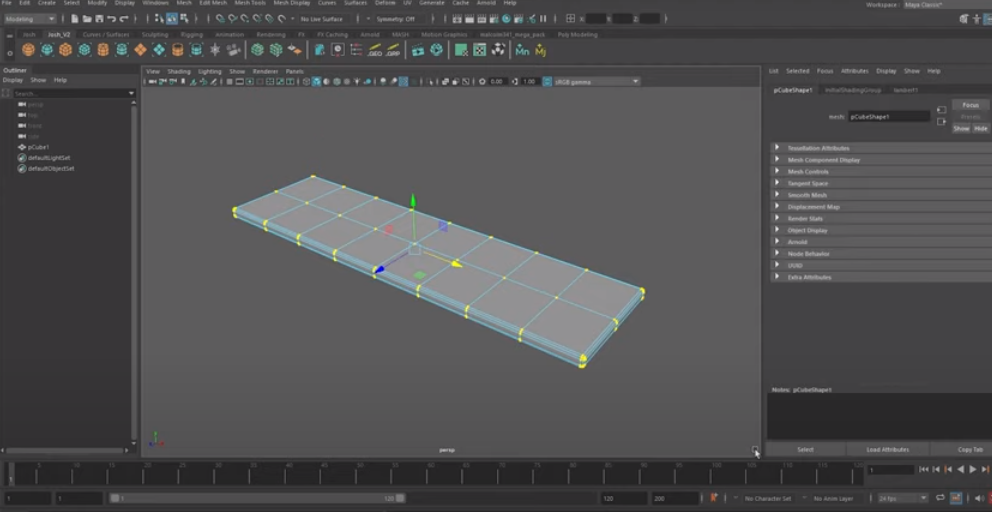
You can go ahead and select all the vertices on the mesh.
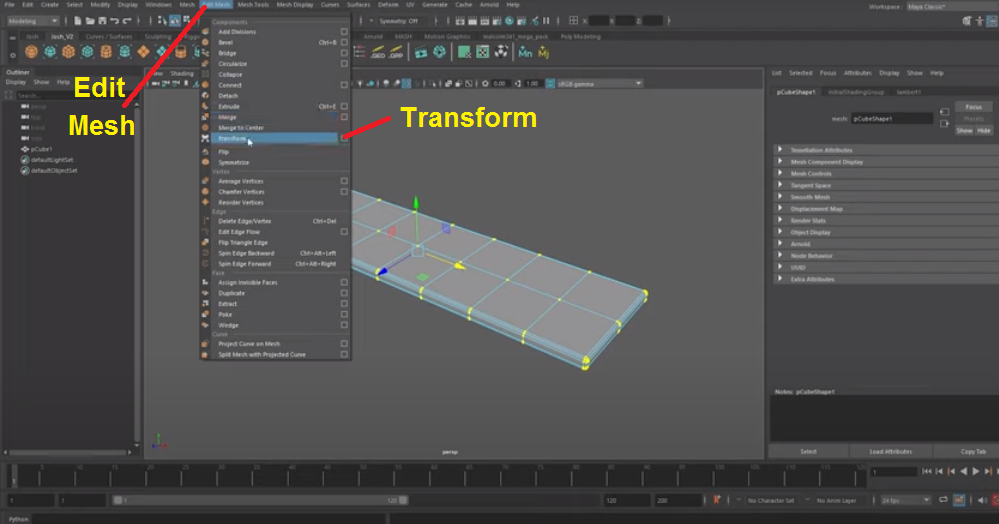
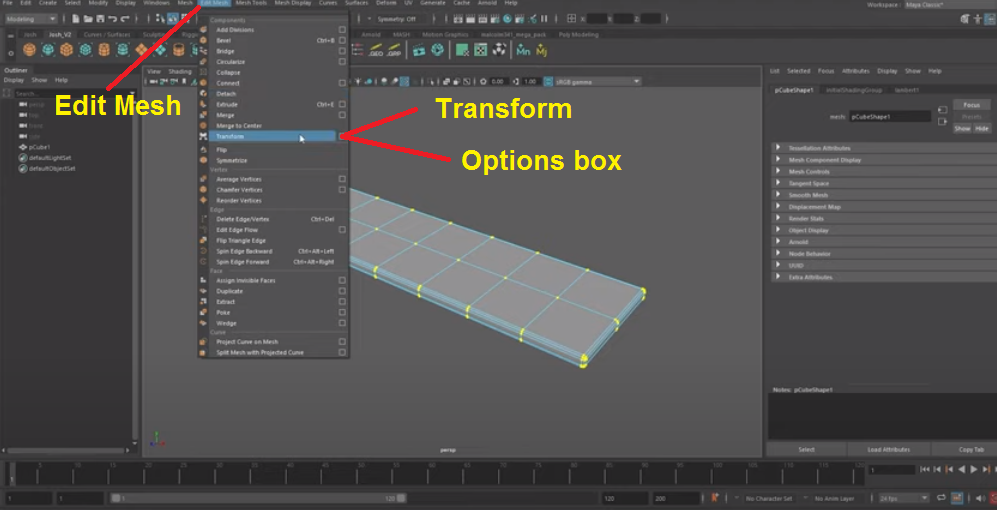
To transform a mesh, you first select "Edit Mesh" from the ribbon in the top menu. From there, you then select "Transform."
The Transform tool will create a manipulator and align with the component when placed on the surface of a component. It allows you to modify its normal direction.
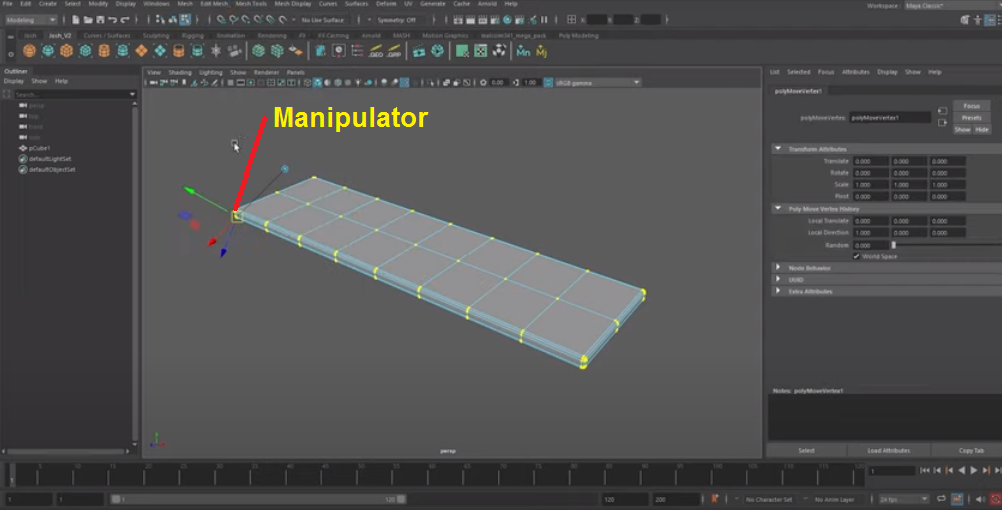
If you move the manipulator, you will see how the model moves. The motion should be more random than that.
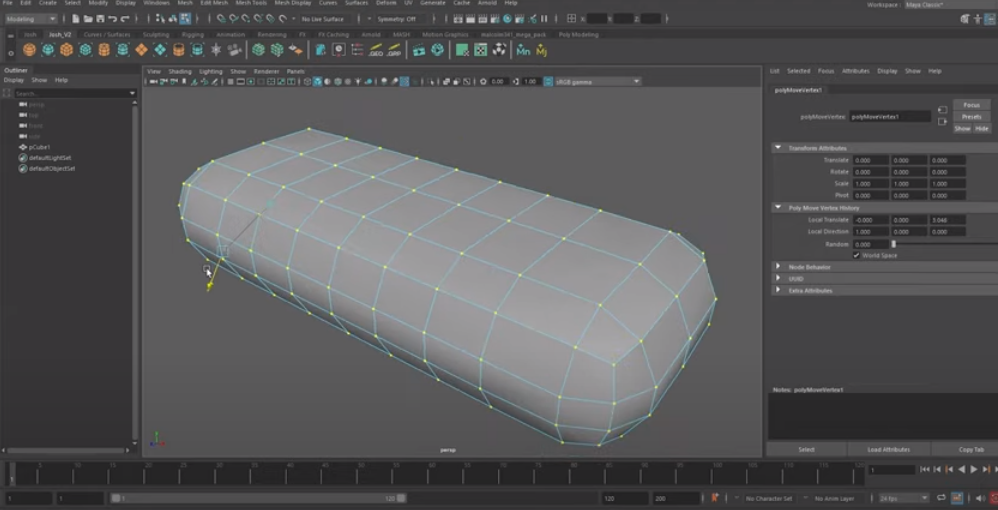
To edit the shape of a mesh, select "Edit Mesh" from the ribbon on top of the screen, choose "Transform," and then click on the little "Options Box."
You can control the level of displacement of the surface by adjusting its vertices, while you can modify the shape of the mesh using this slider.
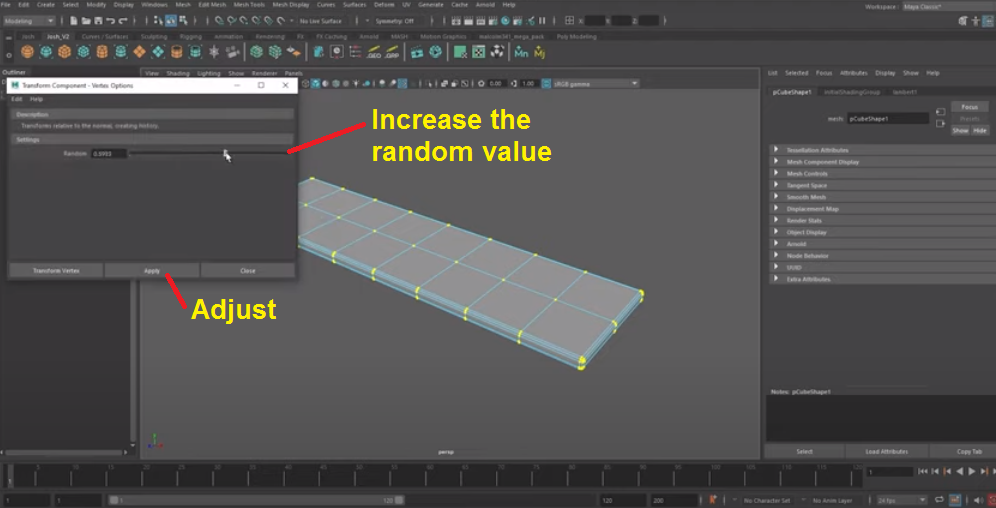
They all go in different directions and not just in the direction of their normals. Let's not go ahead and do anything too extreme.
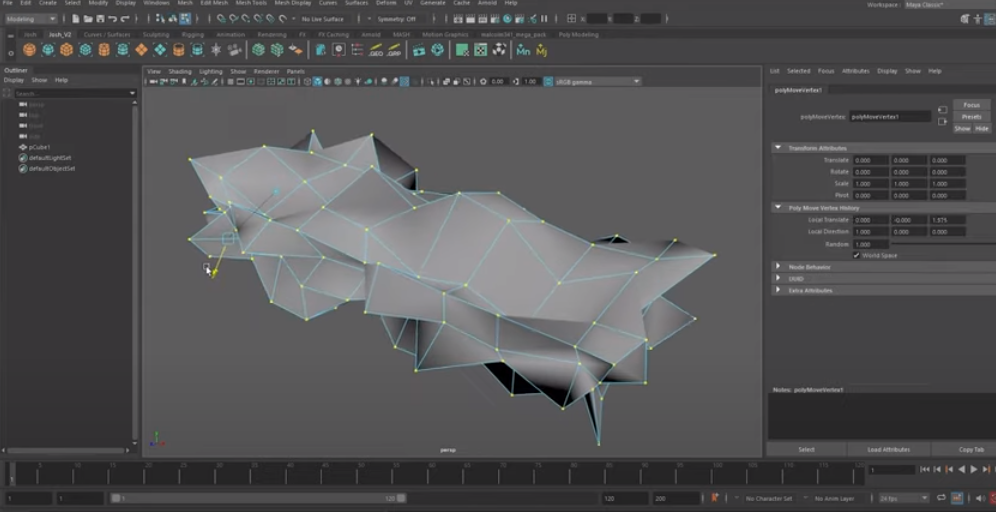
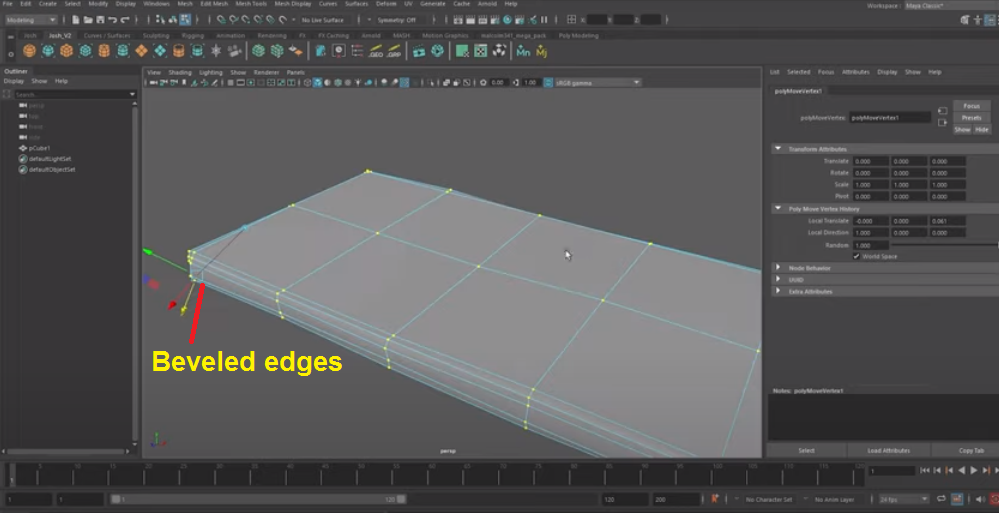
You can see we get some nice edges here, and it works especially great on beveled edges.
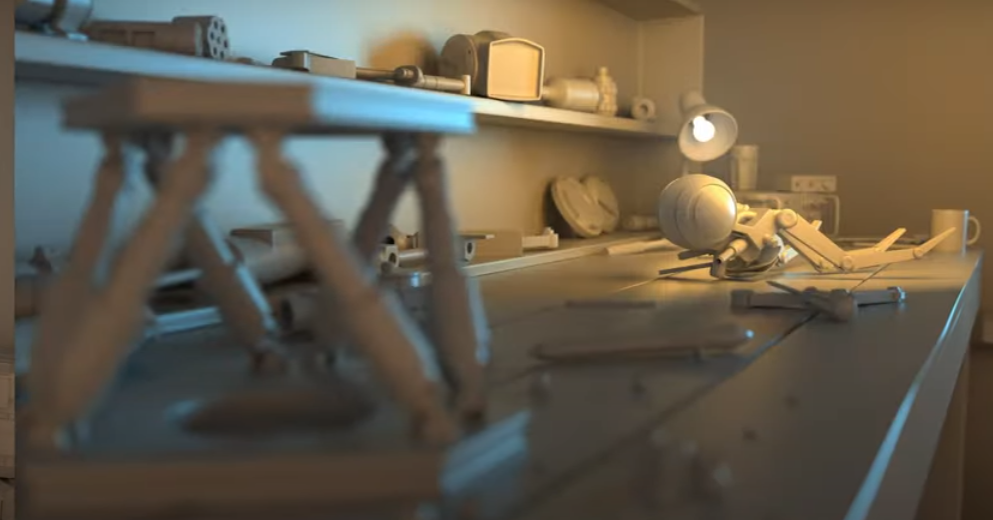
Here are some renders in which you can use this technique.
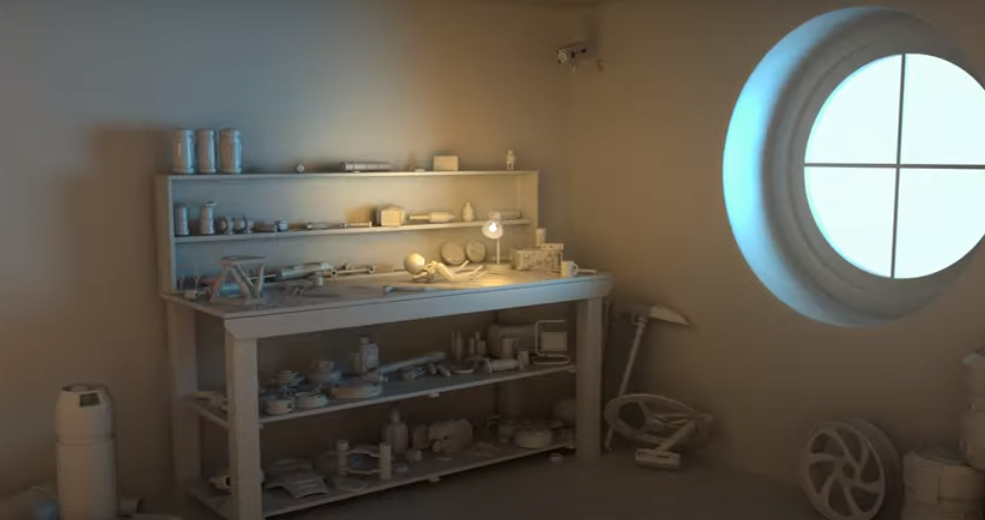
It was a great way to achieve a quick wooden desk effect.
An Edge Flow tool is a powerful tool that you can use to create smooth and natural-looking curves with ease. To use the Edge Flow tool in Maya, select it and then click an edge or another face of an existing curve. This method will cause the curve to follow the directions of the adjacent faces.
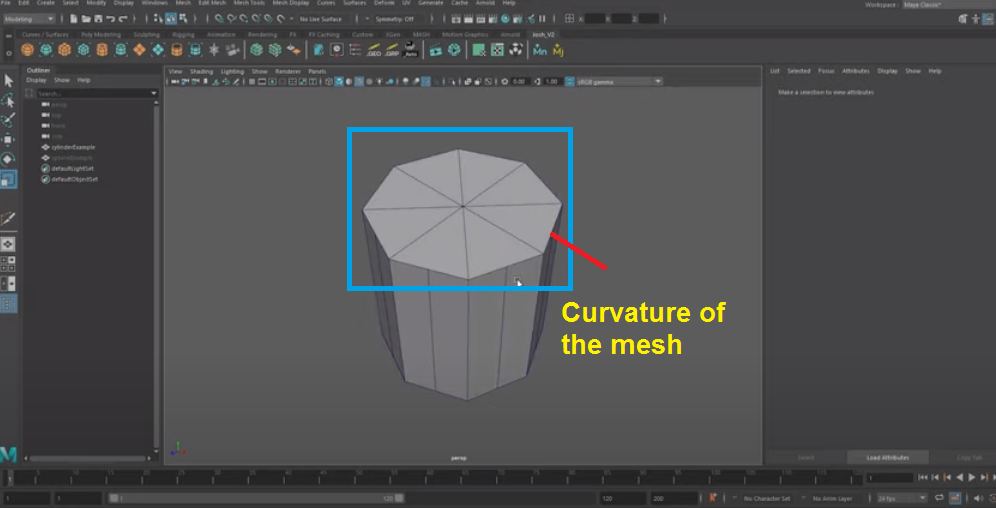
Next is the Edit Edge Flow tool, a super handy tool if your models look wobbly and not how they're supposed to look. A nice way to show you how this tool works is on the cylinder. We've gone ahead and added some new edges on every face.
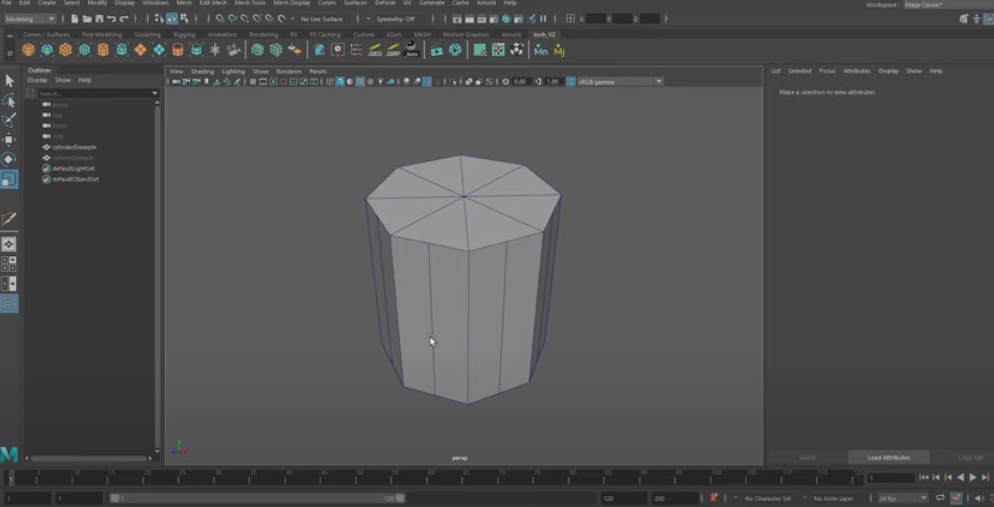
These edges don't work with the curvature of our mesh.
If we were to subdivide, notice how we lose the roundness.
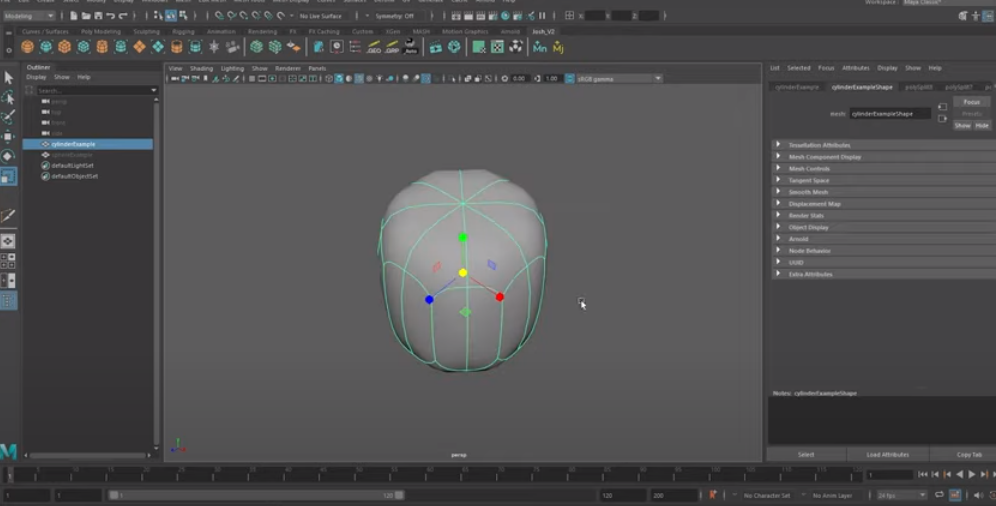
Please ignore the fact it's collapsing. That's just because we didn't add any support and edges yet.
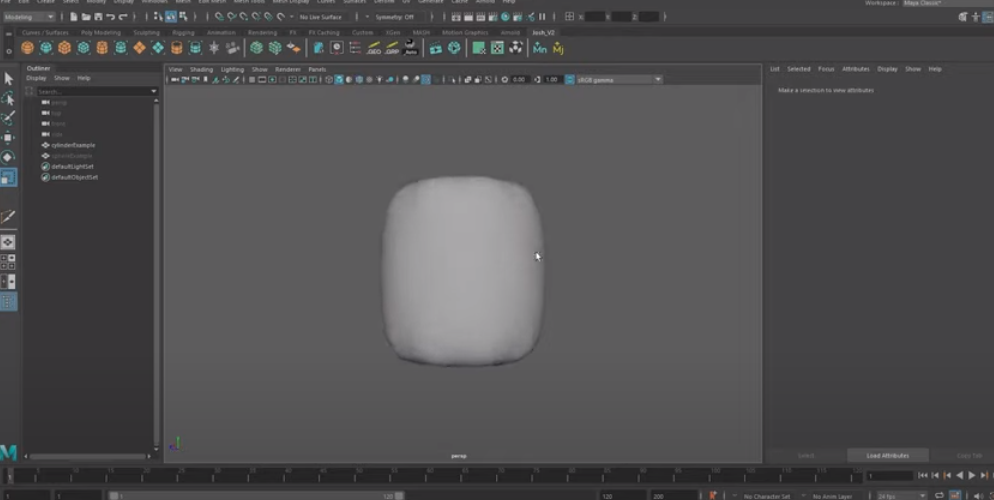
You can select all the edges you want to adjust.
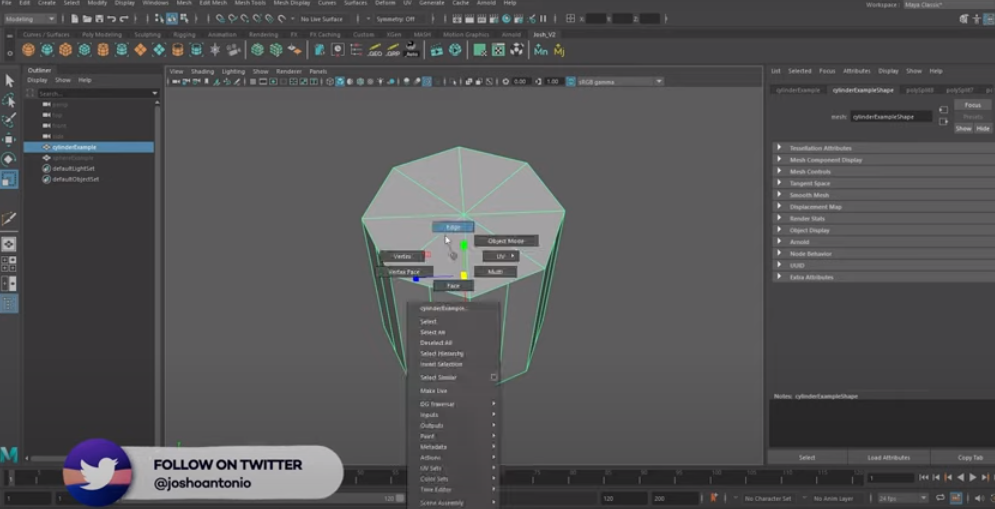
To solve the issue, let's use the Edit Edge Flow tool. Select "Edit Mesh" on the ribbon at the top of the screen and choose "Edit Edge Flow."
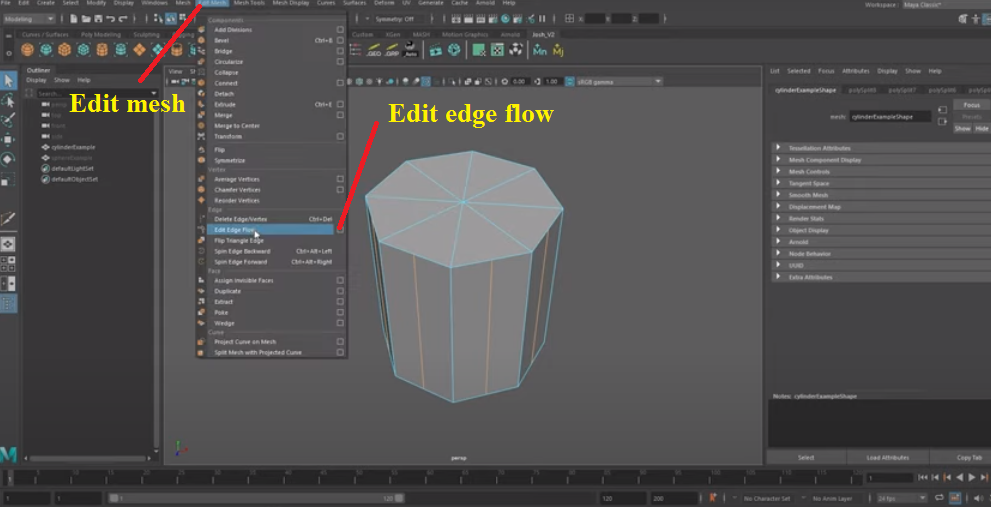
The Edit Edge Flow Options window appears. In this case, at level 0, the selected edges move to the middle of the nearby other edges, creating a flat transition. At a higher Tolerance value, the Selection is adaptively sub-divided by smoothing out each edge's shape and moving its vertices to lie closer to those of neighboring polygon edges.
In particular, the vertices are moved along their normals so that each triangle remains equilateral. Suppose you set Tolerance to 2 or more. In that case, the Selection influences the Tolerance: subdividing an edge also changes it so that one edge becomes two edges with a smaller distance tolerance between them.
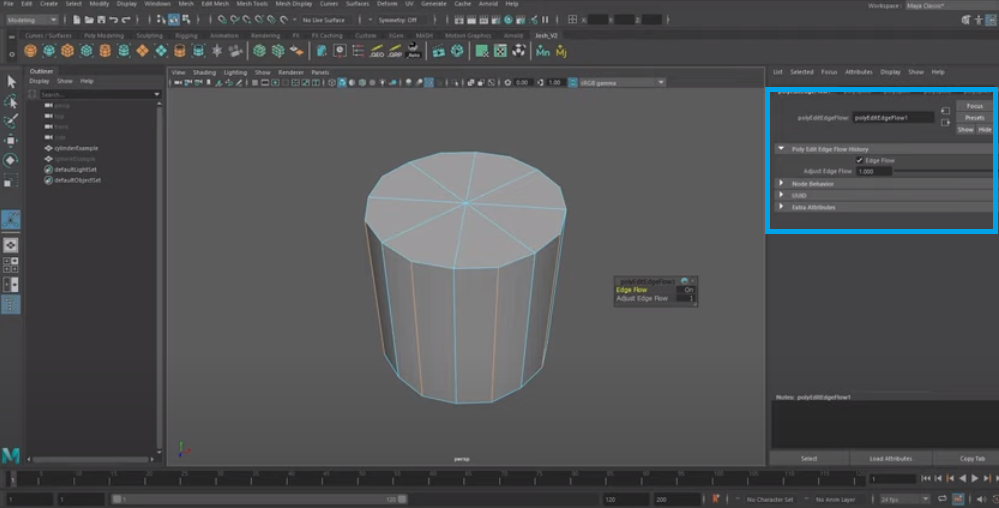
Let's hide this example and switch over to this object.
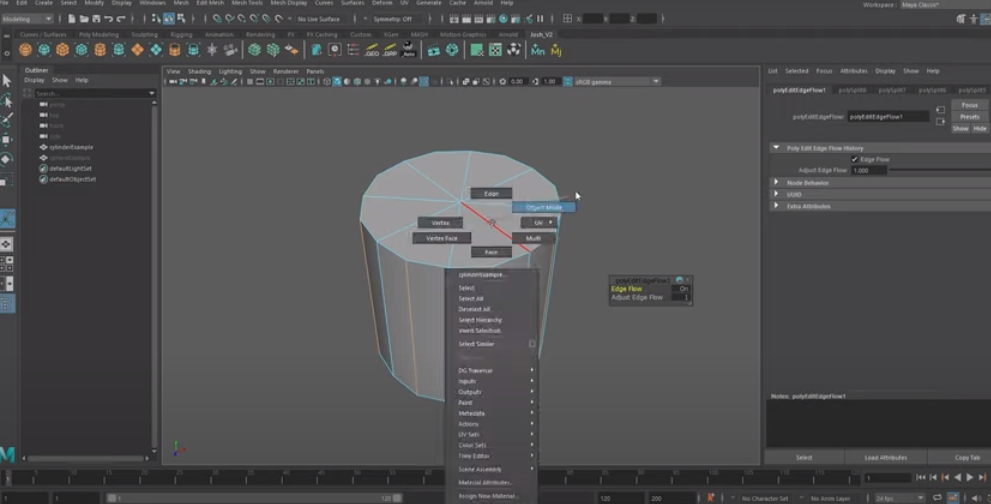
A good way to show the tool in action is on a sphere.
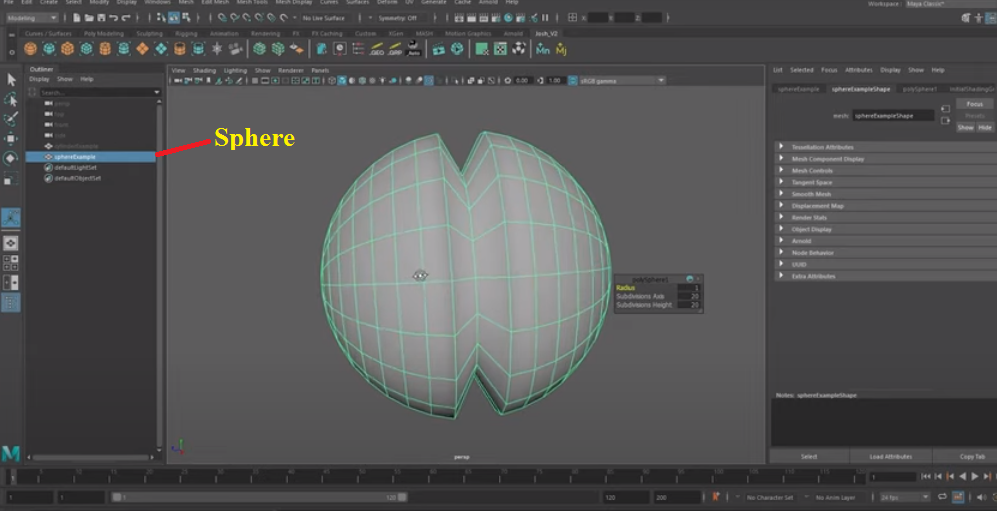
If we use Edit Edge Flow on this misplaced edge, it's going to instantly fix it based on an average of these two edges on either side.
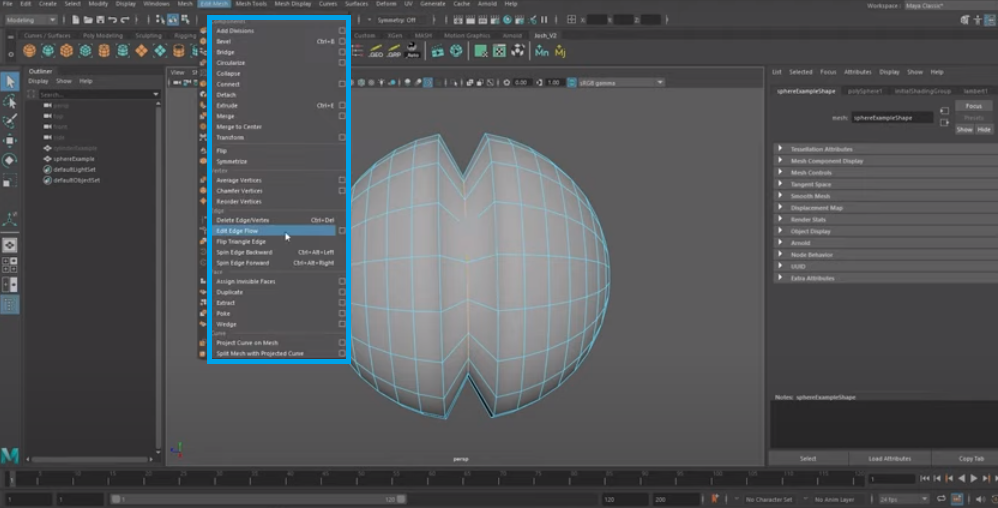
This tool is really useful when you're adding extra edges to surfaces and don't want to ruin the flow of existing faces. This tool and the average vertices tool work great together to achieve excellent, smooth final results.
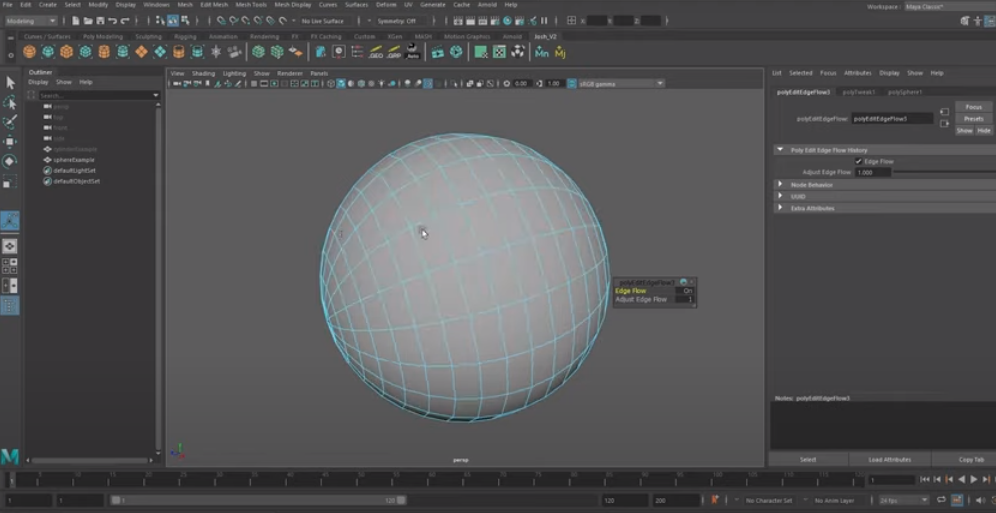
There are two options to set what happens when you select Edit Mesh > Wedge.
Arc Angle: The Arc Angle tool allows you to select an edge for the source axis and then enter specific rotation about the selected edge.
Divisions: This option enables you to modify the number of subdivisions around the rotation. The value entered under this section is the default number a subdivision level will have when applying the NURBS modifier.
The next tool is the Wedge tool; wedging faces can be much faster than manually extruding a bend from a face to make things easier to go into the multi-component mode.
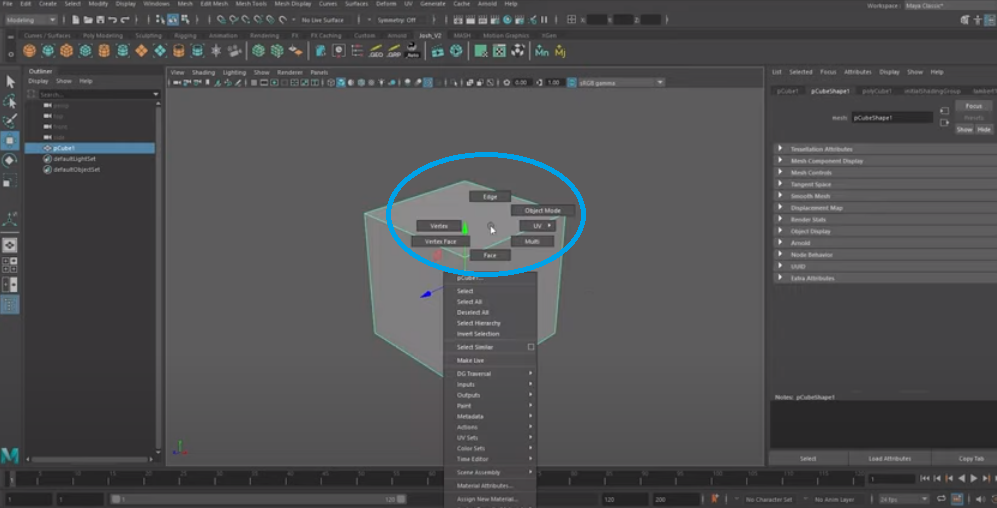
Let's go ahead and select the face we want to wedge. Once we've done that, we should make an edge selection that will be the pivot point for our wedge.
Without deselecting our face, use shift and click that edge. This way, we have both an edge and a face elected. The face is what we want to wedge, while the edge will be the pivot point.
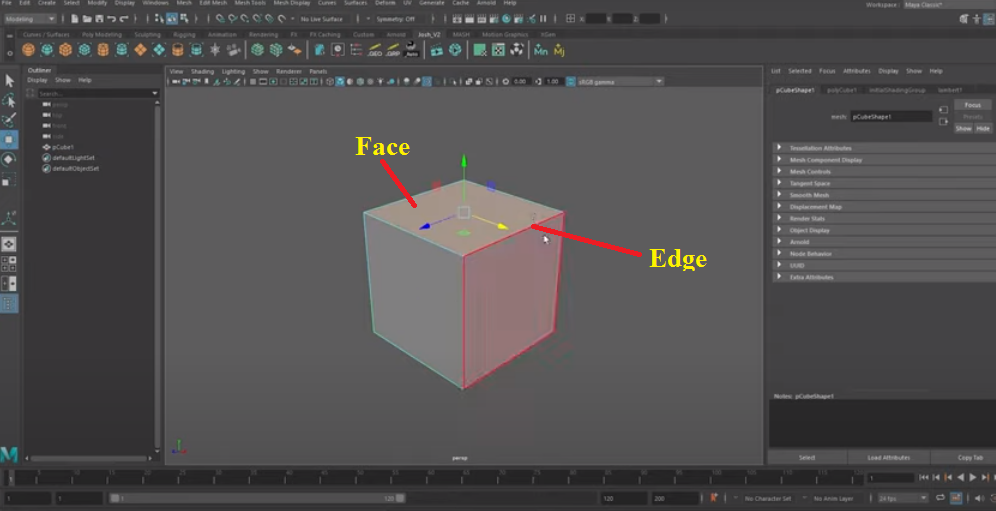
Go ahead and hold down shift and the right mouse button and head to wedge face.
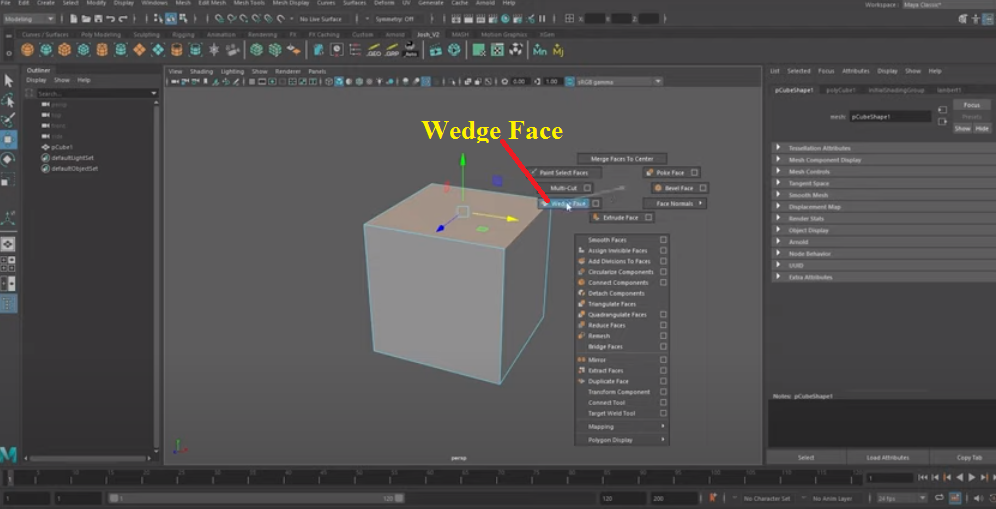
As we get our wedge shape, we can also divide it up to create more smoothness on the final object. To do this, we need to use our Bevel tool. We need to make sure that our wedge shape is right-side up to add divisions. If it's not, go ahead and adjust your view slightly.
The last tool is the flip and symmetrize tools. These tools are a nice way to mirror localized vertex positions without mirroring the whole object if you have a model with some asymmetric details and want those details to be on the other side.
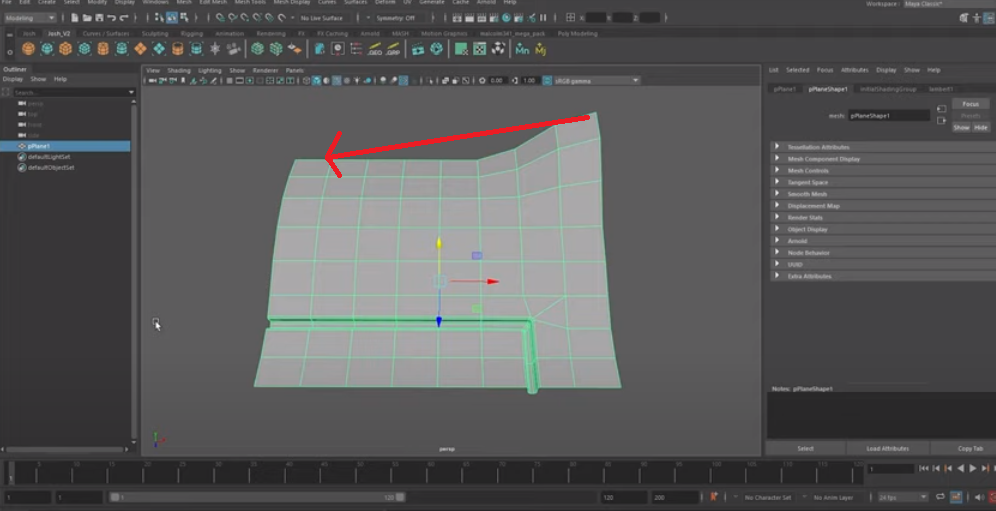
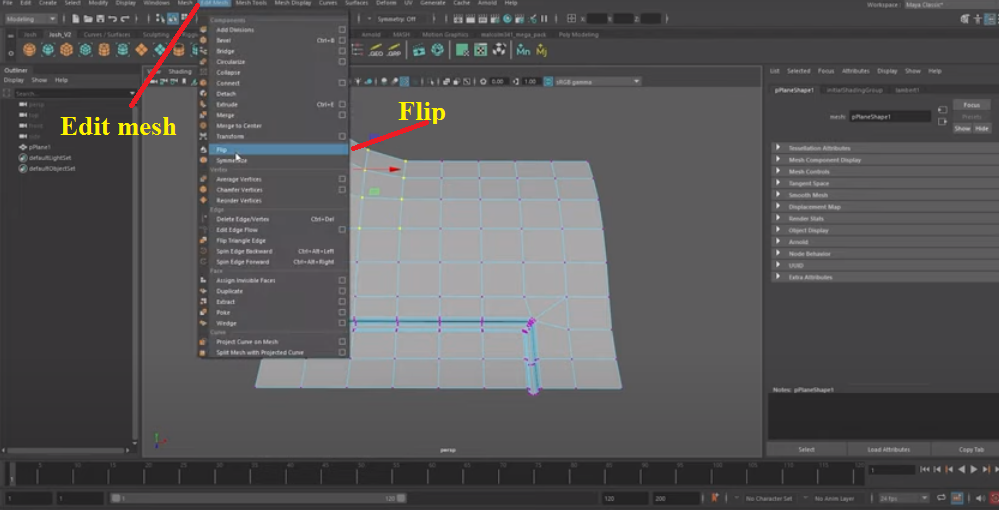
Let's talk about the Flip tool first. As the name suggests, it flips details from one side of the mesh to the other. Select the vertices of the details you want to flip. Select "Edit Mesh" from the ribbon at the top of the screen and choose "Flip."
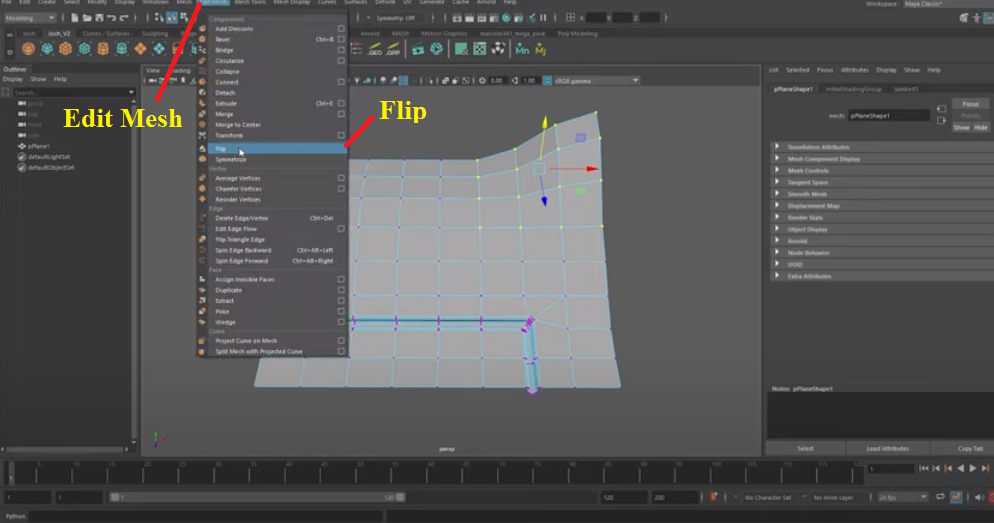
At first, not a lot will happen, but then we need to select an edge for the symmetry. You need to select the plane you want to flip across.
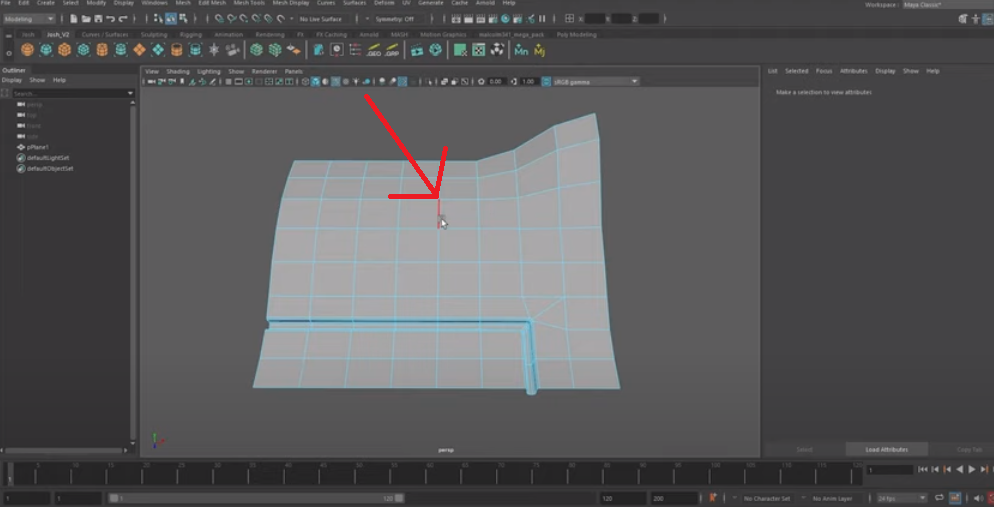
If you click this middle edge, you can see the details flip.
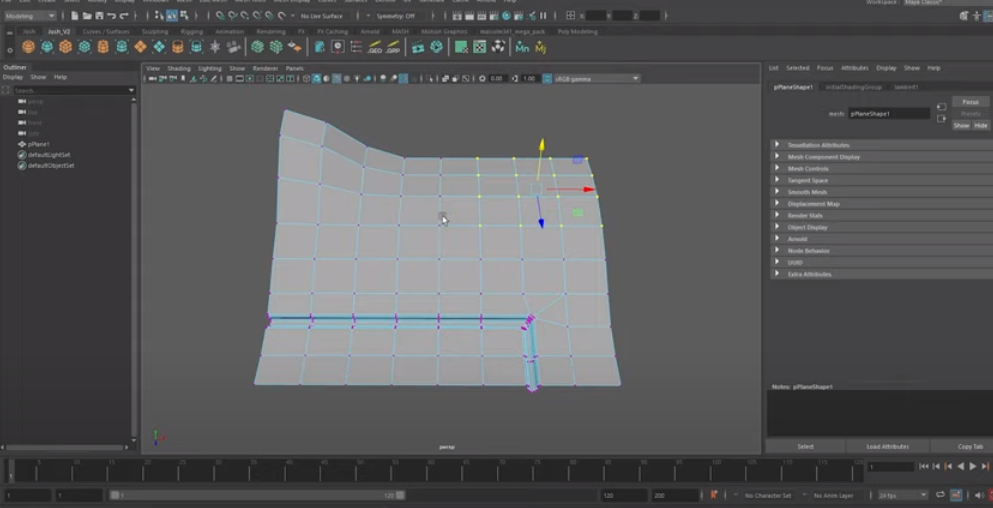
Maya looks for the counterpart vertices to do the flip. Select "Edit Mesh" from the ribbon at the top and choose "Flip."
If we choose a different flip plane, it's not going to work as there's nothing similar for Maya to transfer the positions onto.
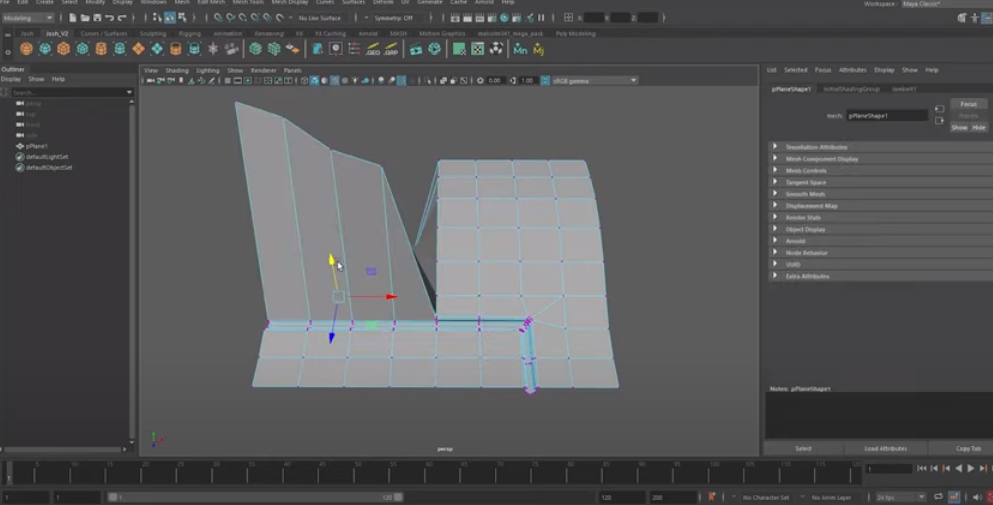
Using this Flip tool is nice as it's not flipping the whole model. It's only flipping these specifically selected vertices. If we move on to symmetrize, you can see it's very similar, with the difference being that it doesn't flip the detail. It copies it from one side to the other.
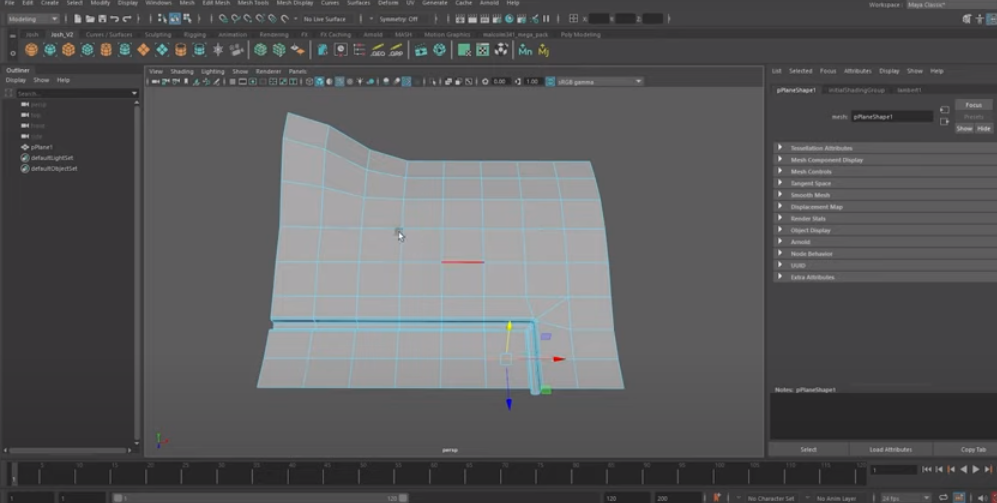
Let's try that and then make sure you have the vertices selected. Go to "Edit Mesh" in the ribbon on the top of the screen and choose "Symmetrize."
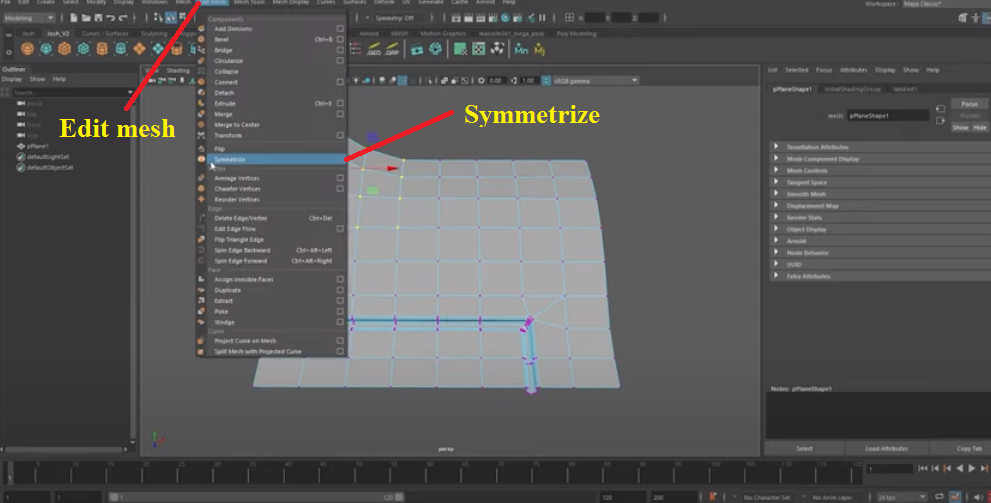
It's not mirroring the whole mesh, only the selected detail.
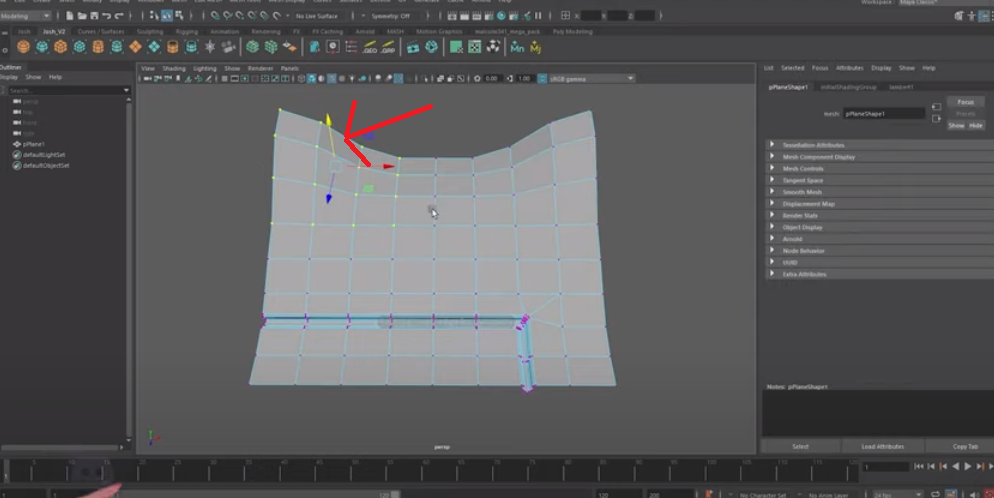
I hope these Maya tools have helped you to create pretty models quickly. Maya modeling tools can be fast and effective if used correctly and modeled with a solid parametric workflow.
Use these tools, techniques, and tips to your advantage while in Maya modeling, as they will help you work more efficiently through your pipeline.
Reuse modeling techniques and ideas in Maya by taking advantage of the existing tools like Isolated Select, Invert Selection, Attract to Control, and more. Do this because repetition is key to modeling. Export your Maya glTF model to p3d.in so that you can upload and visualize your Maya glTF model on their online platform.